I’m no professional contractor but I am a pretty handy guy. I learned the art of bubblegum and duct tape from my old man and Red Green, but have learned the ways of ‘Making it Right’ from a healthy dose of HGTV. I think I’m smart enough to call in the pros when I’m in over my head, but I’m definitely comfortable with general framing and finishing work. Last year my wife and I decided that our kids have shared a room long enough so I subdivided their room into two smaller bedrooms. It looks great and the bedtime routine is a ton easier. The problem now is the only bathroom on their floor is a two-piece. It had been a year since I finished the last reno and I was getting itchy feet again.
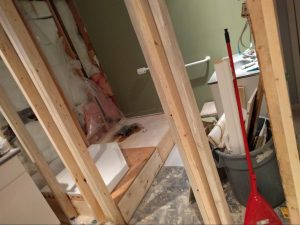
To start, I had to open up the walls and assess the situation. I take pictures with my phone at every stage because when you have to put things back the way they were, a photo makes that process much simpler. In my case, I got pretty lucky with the outer wall with the pocket door I was removing. There was only one electrical run and I was able to shut the circuit off, disconnect it all, pull it through the studs and reconnect everything back up without it costing me. The wall came down pretty easily. I left the toilet and sink intact so the kids could use them for a few weeks while I did my planning.
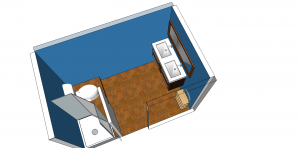
I used Sketchup for my planning. If you’re lightly technical and haven’t tried Sketchup, you’ve got to check it out. It is a really fantastic tool that lets you quickly create a 3D rendering of your project and with relative ease. The bonus is you can actually walk through your project virtually once you have completed your model. I started by drawing out the floor, adding walls and adding in the things that aren’t moving, which in my case was just the toilet. I was able to import a 3D toilet that was almost identical to my existing throne and easily put it in place.
Now it was time to pick my major fixtures out, and I went hardware store route for the shower and the IKEA route for the sinks. I downloaded the IKEA mobile app, and to be honest, I was really disappointed. It was barely functional and didn’t give me the info that was easily accessible on their website. I decided to browse on my laptop in this case to see nice big shiny photos. I settled on a small double sink cabinet called the GODMORGON / ODENSVIK. I figured the double sink will save me on average 30 seconds a day, plus one headache at teeth brushing time with two small boys. By the way, it looks like most IKEA furniture has 3D models available in Sketchup.
Afterwards, I added in the flooring and my neo angle shower. I had to actually draw the shower as I couldn’t find the exact 3D model that I needed.

After having drawn it out, I made my shopping list (sent myself an email from the app!) and starting pricing things out. Amazon was a great help in this step. I picked my shower handle and shower head and ordered them. Lesson learned here – be careful with plumbing orders of two items with nearly identically names that differ by only the words ‘trim kit.’ Basically I ordered the shiny bits but not the actual valve body. When it arrived, I learned my lesson and had to go back and order what I really needed. I ordered a cork floor (yes readers, I know, cork isn’t great for a bathroom), but it’s a cold room and I wanted a warm inexpensive floor. It’s a small room and if I get 10 years out of the floor, my kids will be off to college by then! I ordered some flooring samples from a local supplier and they arrived the next day. I selected my favourite (ok my wife’s favourite) and ordered what I needed. I asked the supplier for some details on installation and was provided with lots of info on properly sealing the floor that I would not have otherwise received. Ask the experts, right?
Finally, I picked up what I needed from IKEA, added the lumber and I was ready to start building.

Step one – I framed up the new walls and the rough opening for the door. Now I know there are lots of leveling mobile apps out there and they can be handy when hanging a picture etc. Instead, I pulled out my 6 foot level for framing. You really need the long surface to get accurate measurements for framing and an ⅛ inch out of plumb at this phase can cause huge headaches later on. Once I had the framing done, I realized two pot lights were not going to be enough in this room anymore so I called my electrician back and he wired it up four LED pot lights. Four is probably overkill, but I will be putting a dimmer on it and better too much light than too little, right?
Step two – I moved onto framing up the elevated floor for the shower. I also called my plumber back at this point to rough in the drain and water supply lines for the new shower. Surprise, surprise, it cost me another case of beer. I installed the shower base at this point and moved onto the drywall.
Step three – I contemplated ordering the drywall for delivery just to save me some time (Home Depot is half an hour away) but in the end I decided it wasn’t worth it so I picked up the drywall myself. I decided to use mold resistant drywall on the back wall of the bathroom as well as behind the shower, then regular drywall everywhere else. The boarding doesn’t take long if you have a sharp knife and a drywall t-square. Putting the pieces on the roof single-handedly is always a pain. I used all the tricks in the book but (not gonna lie) I had to wait for my wife to get home to hold the brace in place.

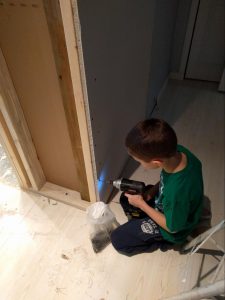
My oldest son is seven years old and he was very useful in the drywalling phase of the project. He’s a very interesting kid and loves talk radio as much as I do. I use the tune in radio app that lets me stream my local talk radio station because it doesn’t have its own mobile app. My son and I would scribe and cut the drywall to size in the garage then haul it into place. I used some shims to hold the board 1/8th inch off the ground and quickly throw a few screws in to hold it in place. An impact driver uses a hammering mechanism to increase the torque while minimizing the twisting of the driver. This means it’s perfect for kids to drive screws. My son was capable of driving hundreds of screws five inches apart in all the boards up to about six feet off the ground with the help of a small step ladder. I can’t tell you how much time it saved me but the best part is that all the while, he was smiling like I had just let him have candy for breakfast.
Mudding and taping is something you either love or loathe. I fall on the love side so when it came time to call in the pros to save me hours and hours of work I just couldn’t do it.
Check back soon for the next installment once I get the mudding done!

Share This Article