

If you manage a WordPress site, you already know that large images are one of the easiest ways to slow a page down. Compressing a photo or a screenshot before it goes into the media library keeps your pages fast and your visitors happy. The catch is that the tool most of us reached for kept getting harder to use, so we built our own. Here is what was going wrong, and what we built instead.
The problem with the tool we used to use
For years our go-to was compresspng.com, and for a long time the site was perfect. Lately a handful of changes turned a quick task into a daily annoyance:
- The automatic compression is gone. The site used to start compressing the moment you dropped a file. Now you have to press a button every single time.
- The “-min” label disappeared. Compressed files used to download with “-min” added to the name, like photo-min.png, so you could tell at a glance which copy on your computer was the smaller one. We often want to keep the original, and the label kept the two files apart. Now the compressed file has the same name as the original, so your computer keeps asking whether you want to replace the file you already have.
- It feels slow. You sit and watch a progress bar work through your photos one at a time. Maybe the animation is meant to show the site is busy, but the waiting adds up.
- Each format is a separate website. compresspng.com only handles PNG, and JPEG files go to a different site, compressjpeg.com. Neither one touches WebP or PDF. The two sites look almost identical, so you drag a file in, get an error, and only then realize you are on the wrong one.
No single one of those is a disaster, but together they turn a ten-second job into a chore you repeat all day.
What we built
We built a single page that compresses every common file type in one spot: PNG, JPEG, WebP, SVG, and PDF. A few things we were careful to get right:
- One place for every format. Every file type compresses on the same page, so there is no guessing which site handles which format and no jumping between tabs.
- Drag, drop, done. Compression starts the moment your files land on the page. There is no button to press.
- Everything happens on your computer. Nothing is uploaded, so there is no progress bar to wait on and nothing ever leaves your machine. The tool stays quick, and it is safe for client work and unreleased assets.
- File names you can trust. Every compressed file keeps its original name with “-comp” added, like photo-comp.png. The compressed copy never overwrites your original, and you can always tell the two apart.
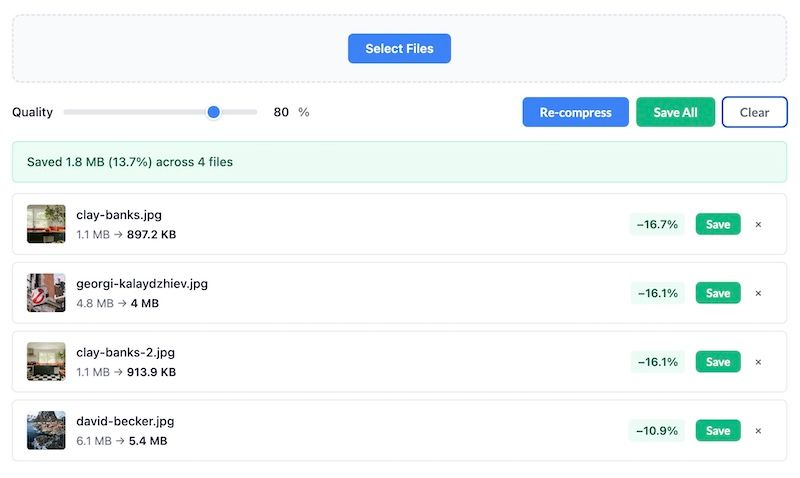
- You can see the savings. Each file shows how much smaller it became, and a summary totals the space you saved across the whole batch.
- A quality slider. Drag the slider down for smaller files or up for higher quality, whichever the job calls for.
- Save everything at once. When you finish a batch, “Save All” downloads every compressed file in a single zip.
- Up to 20 files at a time.
How to use it
- Open the compressor page.
- Drag your images or PDFs onto the page, or click Select Files.
- Wait a moment while each file compresses on its own.
- Press Save on a single file, or Save All to download the whole batch as a zip.
- Upload the smaller files to your media library as usual.
Those five steps are the whole process. There is no account to create, no settings to configure, and no upload to wait on.
Why it is worth the switch
Smaller images mean faster pages, and faster pages mean a better experience for your visitors and a small lift for your search ranking. Keeping every format in one place also means you spend less time hunting for the right tool and more time on the content itself.
The compressor is free to use and lives right on the site. A follow-up post will walk through how the tool works behind the scenes, for anyone who wants the technical side of the story.
Image attribute: Photo by Devin Pickell on Unsplash
Share This Article